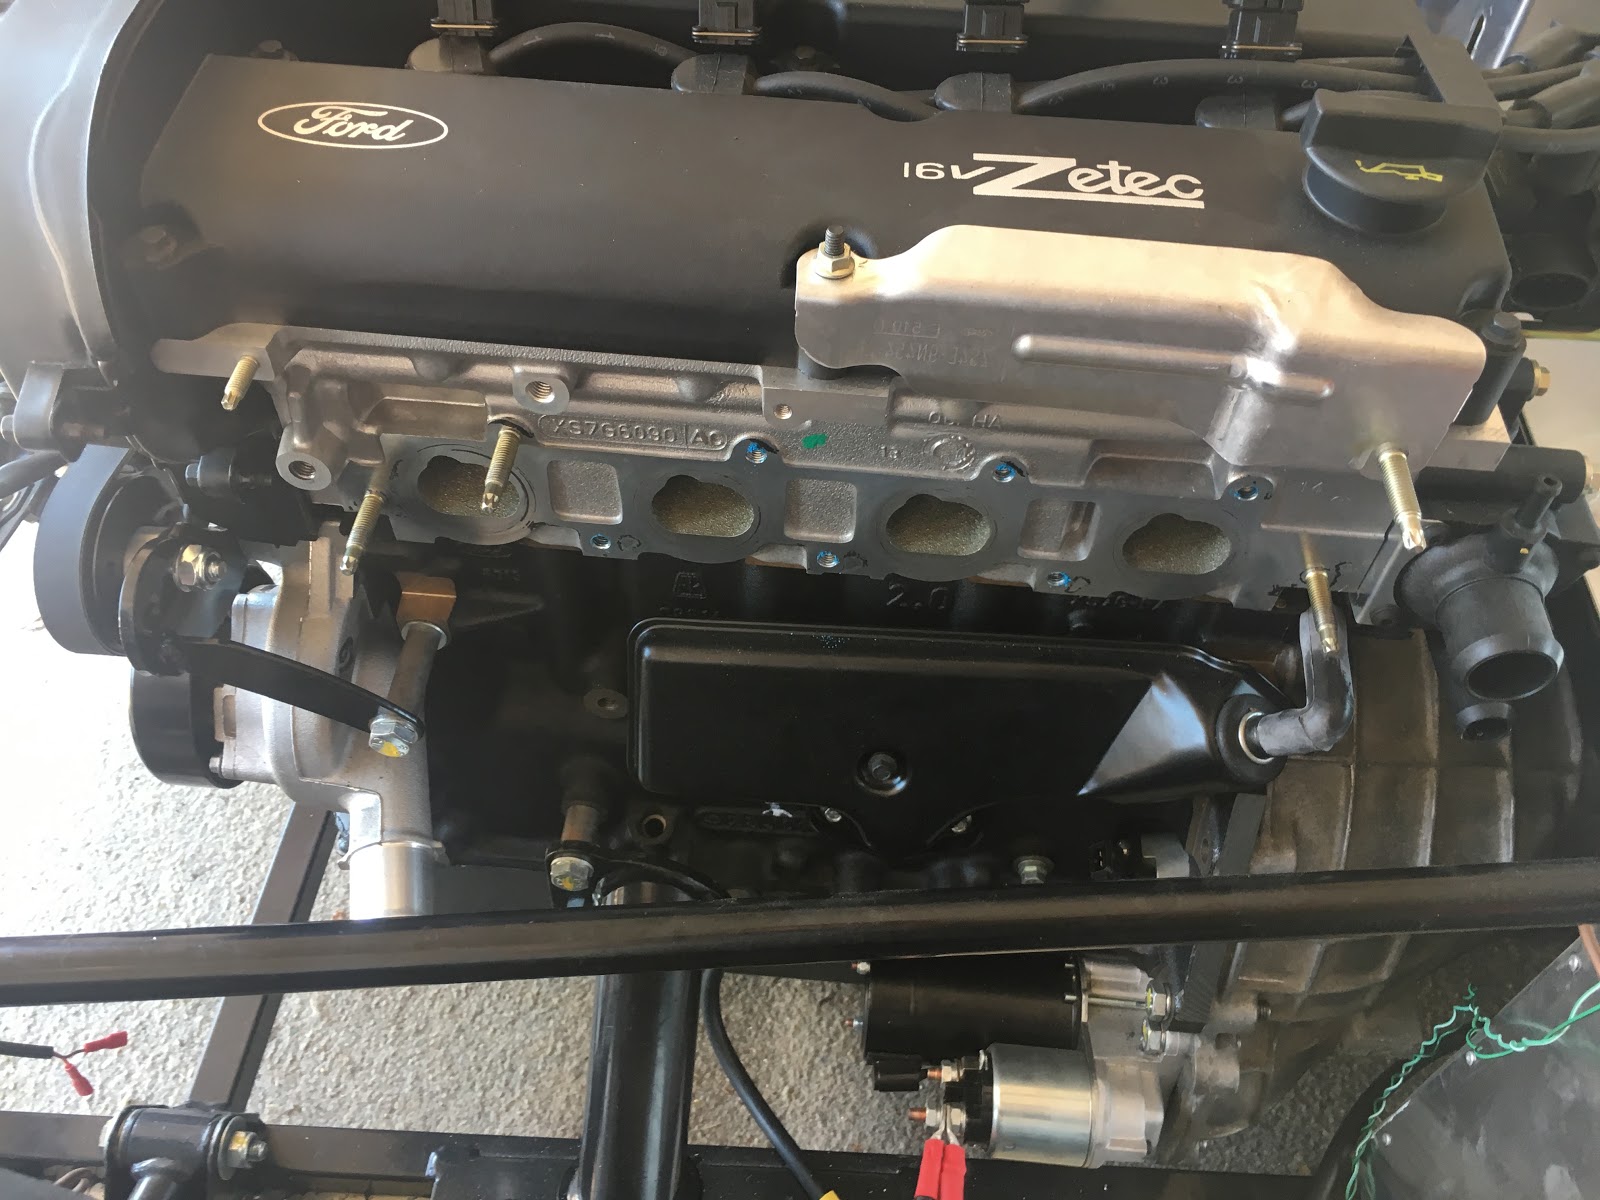
I purchased the GBS Plenum, it replaces the stock intake manifold and its a great piece of kit. It also seems like a have version 2.0 - the addition of a hose connector. This one baffled me for a while but it looks like I have two options.
Option 1 - bung the hole and adjust the throttle screw to get the idle correct. This is what I had originally intended on doing, admittedly because I didn't understand what an IACV was.
Option 2 - connect up a remote IACV. Now that I know what it does (and that GBS sell a mounting bracket) I am going to chose this option. The Emerald ECU has instructions on how to setup the IACV when its required and I am looking forward to that challenge; if I can't do it I will be able to find someone who can.
The Plenum is very well made and comes powder coated. The original manifold needs to be cut down and this is a service that GBS do and I would recommend it as it needs to be done correctly:
There is also a threaded hole which accepts the air temperature sensor - top tip from me (common sense now...) clean the thread out *before* fitting the Plenum to the car!
I wasted around an hour of absolute faffing around trying to fit the sensor and it was impossible whilst on the car. I actually ended up cleaning the thread out after checking the sensor size and thread pitch on the emerald site (M12 1.5 BTW):
Once the thread was cleaned up the sensor went in fine, throttle body attached to the car and we are done:
The fuel rail will be sorted later on, its simply resting to seal the holes up. Looking very much like an engine now:
Tuesday, 10 July 2018
Alternator
I enjoyed this one. I had already been given an alternator for free when I purchased my flywheel, unfortunately the brackets didn't fit so I thought I would save the time and effort required and went for the GBS kit. Everything required to fit the alternator is in the kit:
The brackets are all power coated and its obvious they are very good quality - one of the good things I like about the GBS supplied parts. The bad thing is they came with no instructions only a note saying download them off the kitspares site; the problem with that is they are a set of pictures. From what I could see the pictures were also of two different types of alternator and brackets (I think!).
It felt a little bit like when you buy Ikea furniture, at first it makes no sense at all but when you are half way though it all comes together. Anyway if you do buy the kit you will have no problems fitting it and working out how it fits together, for me it was a nice and easy couple of hours work:
You can see I removed one of the metal "bolts" in the block, both need to be removed and are not required.
The tensioner pulley is attached as per the picture. I had to take it off at first go as I mounted it in the hole above the manifold (I wasn't paying attention...). It also connects to the front of the block and is very sturdy:
Next we have to remove the lifting eye and fit the bracket which is attached to the rear of the alternator top hole:
There are a number of washers required to make sure the alternator is square, I used a piece of wood at the front to check.
The bottom bracket connects to the engine block and again a few washers are required to pad out the bottom bolt. Time to fit the belt:
The tension looks OK but I need to check how to tension it up correctly - I guess I will find out later on!
The brackets are all power coated and its obvious they are very good quality - one of the good things I like about the GBS supplied parts. The bad thing is they came with no instructions only a note saying download them off the kitspares site; the problem with that is they are a set of pictures. From what I could see the pictures were also of two different types of alternator and brackets (I think!).
It felt a little bit like when you buy Ikea furniture, at first it makes no sense at all but when you are half way though it all comes together. Anyway if you do buy the kit you will have no problems fitting it and working out how it fits together, for me it was a nice and easy couple of hours work:
You can see I removed one of the metal "bolts" in the block, both need to be removed and are not required.
The tensioner pulley is attached as per the picture. I had to take it off at first go as I mounted it in the hole above the manifold (I wasn't paying attention...). It also connects to the front of the block and is very sturdy:
Next we have to remove the lifting eye and fit the bracket which is attached to the rear of the alternator top hole:
There are a number of washers required to make sure the alternator is square, I used a piece of wood at the front to check.
The bottom bracket connects to the engine block and again a few washers are required to pad out the bottom bolt. Time to fit the belt:
And complete:
The tension looks OK but I need to check how to tension it up correctly - I guess I will find out later on!
Cooling System
Over a year has gone by - I have been busy, unfortunately the car has had to take a back seat but here I am, back on it and jumping straight back in at the deep end.
So, onto the Cooling System! I placed an order with GBS last week and purchased everything necessary for to complete the cooling side of the engine. The kit is really good quality and comes with everything you need, there aren't any instructions but its fairly self explanatory - previous blog posts helped.
The kit as it came:
You will notice the mounting bracket that connects to the steering column mounts, the tube is pretty solid in place but I guess after a while and with a lot of heat cycles the hoses will get softer and maybe sag. Its a GBS part and easy to fit, the pipe itself is attached to the bracket via cable tie.
So, onto the Cooling System! I placed an order with GBS last week and purchased everything necessary for to complete the cooling side of the engine. The kit is really good quality and comes with everything you need, there aren't any instructions but its fairly self explanatory - previous blog posts helped.
The kit as it came:
The water rail kit gives you all you need to setup the rail only, you do need to purchase the additional pipes to route from the water pump and the rail to the radiator. I forgot to photo the contents of the kit however you will see it later on as I progressed.
First step was to remove the stock Exhaust Manifold, then the oil flame trap - there's a bit of discussion as to whether this is required - however the norm is to remove and block it off, which I have decided to do with the ATR blanking plate from GBS:
Much better and more room. Next was removing the stock thermostat housing, cleaning and replacing with the GBS part (much more sturdy!). Based on my previous experience with coolant systems a small smear of gasket seal was in order too...
I've also fitted the dipstick - straight forward. Next it was time to fit the radiator and fan, really simple and a 10 minute job although a quick read of other blogs helped (tabs need to be bend backwards so the radiator sits on the inside of the mount otherwise nose cone will not fit):
Looking good! Onto plumbing her in....again, another simple job that requires a methodical approach:
You will notice the mounting bracket that connects to the steering column mounts, the tube is pretty solid in place but I guess after a while and with a lot of heat cycles the hoses will get softer and maybe sag. Its a GBS part and easy to fit, the pipe itself is attached to the bracket via cable tie.
Saturday, 12 August 2017
Engine Fitted
Time is marching on and progress is slow on the Car. Its been a tough few months, I've started my own business which is fun but at the same time stressful and funds are still tight. The car has had to take a back seat. I'm still itching to make progress but its difficult to find the time and frankly motivation with everything else going on, but, I do have an update.
The engine has been fitted, I purchased a lowered sump and fitted it and I also re-made the gearbox mount - I wasn't happy enough with the previous one.
Old sump removed, don't forget to remove the bold holding the pickup on. Also I missed a bolt right next to the flywheel, frustratingly I spent ages trying to split the oil pan from the aluminum. I thought it was just suction but alas a pesky bolt was still on.
Old sump removed and ready for the scrap man. Seems a shame to throw it out but its no use to me and goes for pennies on eBay.
New sump ready to be fitted, I used some gasket seal - based on the research I have done, it should be absolutely fine for the job.
Sump fitted:
The starter motor is missing from the pic but it's also now fitted.
And engine in:
I need to buy a modified inlet manifold from GBS as the stock on doesn't fit, plus a plenum. That's it for now. Garage cleanup due.
The engine has been fitted, I purchased a lowered sump and fitted it and I also re-made the gearbox mount - I wasn't happy enough with the previous one.
Old sump removed, don't forget to remove the bold holding the pickup on. Also I missed a bolt right next to the flywheel, frustratingly I spent ages trying to split the oil pan from the aluminum. I thought it was just suction but alas a pesky bolt was still on.
Old sump removed and ready for the scrap man. Seems a shame to throw it out but its no use to me and goes for pennies on eBay.
New sump ready to be fitted, I used some gasket seal - based on the research I have done, it should be absolutely fine for the job.
Sump fitted:
The starter motor is missing from the pic but it's also now fitted.
And engine in:
I need to buy a modified inlet manifold from GBS as the stock on doesn't fit, plus a plenum. That's it for now. Garage cleanup due.
Sunday, 5 March 2017
Engine Trial Fit
Well no update from me for a few months, wow where has the time gone! A lot has happened since the last update, I changed job (money is tight at the moment) and I have actually done a fair bit in the garage.
The engine loom is as before, I need to get the engine in place. It turns out the crate engine I purchased from GBS didn't come with a clutch, which was annoying to say the least. Well, after a fair bit of messing about it also didn't come with a flywheel!!!! I spent a long time trying to get the clutch I have fitted and eventually posted on Rhocar to find out I had an automatic flywheel.
After posting on the wanted form a nice member offered me one for a tenner, I went to pick it up and left with an alternator and clutch as well - not bad for £100 including the bracket and belt.
I decided to trial fit the engine and mark up the mounts, knowing full well the engine needs to come back out again - I am happy with that. Drilling the mounts should be easier too (it was).
I took my time, here are some pics. See the top flywheel? I have been told that's for an automatic - completely wrong, the new one is underneath:
Nice home made locking tool:
Flywheel and spigot bearing in:
Next I moved onto the engine. Actually this part was fairly easy, even with one person. The trick was to jack up the front end enough to let me get the legs from the hoist under, but not too far that the Gearbox wouldn't fit the other side:
Notice on the last pick I had to take the inlet manifold out, it just doesn't fit with it on. I am missing the mount for the bottom of the box to the GBS supplied rubber mount, which I decided to make. I need to add a small piece of steel to re-enforce as I am not 100% happy with the box steel I used:
Hard to see but it does the job, its all coming out anyway so I'll get a better picture once I add some re-enforcement. Next onto lining the engine up, again using my auto leveling laser. I've already marked the central point at the front and the rear, lining the two up I can then make sure the centre of the crankshaft is in the middle then mark up the mounts:
Hard to see in the light but - its central, not much clearance between the oil filter and steering column, guess that's why I bought the shortened filter then....
I've drilled and fitted one mount and left the other. I finish today feeling frustrated, nothing seems to be going right. The clutch kit I originally bought is too big (228mm) and the one I have now is the right size (220mm) BUT the spline count is 17 and it needs to be 23. Need to find a new clutch plate, hopefully on ebay.
I've also shorted out my battery charger so tidied up and shut the garage door for today. Shortened sump and alternator on order....
The engine loom is as before, I need to get the engine in place. It turns out the crate engine I purchased from GBS didn't come with a clutch, which was annoying to say the least. Well, after a fair bit of messing about it also didn't come with a flywheel!!!! I spent a long time trying to get the clutch I have fitted and eventually posted on Rhocar to find out I had an automatic flywheel.
After posting on the wanted form a nice member offered me one for a tenner, I went to pick it up and left with an alternator and clutch as well - not bad for £100 including the bracket and belt.
I decided to trial fit the engine and mark up the mounts, knowing full well the engine needs to come back out again - I am happy with that. Drilling the mounts should be easier too (it was).
I took my time, here are some pics. See the top flywheel? I have been told that's for an automatic - completely wrong, the new one is underneath:
Nice home made locking tool:
Flywheel and spigot bearing in:
Notice on the last pick I had to take the inlet manifold out, it just doesn't fit with it on. I am missing the mount for the bottom of the box to the GBS supplied rubber mount, which I decided to make. I need to add a small piece of steel to re-enforce as I am not 100% happy with the box steel I used:
Hard to see but it does the job, its all coming out anyway so I'll get a better picture once I add some re-enforcement. Next onto lining the engine up, again using my auto leveling laser. I've already marked the central point at the front and the rear, lining the two up I can then make sure the centre of the crankshaft is in the middle then mark up the mounts:
Hard to see in the light but - its central, not much clearance between the oil filter and steering column, guess that's why I bought the shortened filter then....
I've drilled and fitted one mount and left the other. I finish today feeling frustrated, nothing seems to be going right. The clutch kit I originally bought is too big (228mm) and the one I have now is the right size (220mm) BUT the spline count is 17 and it needs to be 23. Need to find a new clutch plate, hopefully on ebay.
I've also shorted out my battery charger so tidied up and shut the garage door for today. Shortened sump and alternator on order....
Wednesday, 21 December 2016
Engine Loom - Part 1
My engine is now sat in the garage with the Gearbox and mounts as well as a few other bits and bobs. Its been a while since I put an update on but I have been busy! Before I dive in I thought I would start work on the engine loom.
Its available to purchase from GBS as a ready built item - but where is the fun in that? I fancied a challenge and thought it was something I could learn a great deal from and so far, I am not wrong. Its not too complicated, I am by no means an electrician but I am learning as I go along. With help from GBS, forums and a fair few wiring diagrams I am starting to make progress.
I thought I would start with a Visio diagram but soon realised that was getting too complicated and it was hard to get my head round each of the components, where the loom will run etc so went for a piece of MDF:
I decided to tack everything out as I went. I had already the fly lead for the Engine plug from GBS and the same from Emerald (I am going down the K6 route). Both are very good quality, frustratingly I have no documentation at all for the pin outs on the GBS side but a post on the owners club forum fixed that for me. It is a shame that you have to dig so deep for some of the info but I guess they are running a business. The Emerald documentation is great and the fly lead is very good quality.
After a few hours I ended up with this:
Days later and again, more progress:
I have chosen to use temp snap connectors for now, that way if I do need to change anything its easy for me to do. Obviously the finished article will require a lot of soldering but I plan on getting the engine running with the wiring "loose" and then properly cutting to length and making a decent job of it, for now though I have this:
That has taken me weeks to do, I have thoroughly engjoyed the process so far. I think that will be it now till after Christmas - I have a dining room to tidy....
Subscribe to:
Posts (Atom)